

How to Embroider Letters with a Sewing Machine
Embroidery as a technique makes messages more meaningful and heartfelt. It makes it more personal and an efficient way to express oneself.
From clothes, handkerchiefs, to monograms and quotes, embroidery sure brings positivity. Hence, embroidered items make it an ideal present or thank you gifts.
What if you like to try embroidery but you don’t have the proper machine for it? Or you are already into it but would like to level up your skill? This article aims to help you solve the problem by using a sewing machine.
Can You Embroider Letters With A Sewing Machine?
Contents
- Can You Embroider Letters With A Sewing Machine?
- How to Embroider Letters with a Sewing Machine?
- How To Embroider Letters With Brother Sewing Machines?
- What Is The Best Stitch To Use To Embroider Letters?
- How Many Threads Do I Need For Letter Embroidery?
- Do You Embroider From Left To Right Or Right To Left?
- Conclusion
Yes. Home sewing machines have a lot of features you can use for free-hand embroidery and also monogram projects. The most basic sewing machines offer different types of stitches, like zig-zag stitches, which can be suitable for embroidery. However, for beginners, it may take some time to get used to.
Practice is essential when it comes to free machine embroidery since you are the one controlling or guiding the canvas to achieve the desired result. Different machine settings are also applied with embroidery compared to traditional sewing. Depending on your machine’s functions, changing the tension, stitch size and presser foot might be crucial.
As technology evolves, home sewing machines advance, too. Computerized sewing machines have been around for years now with new functions added, and this includes alphanumeric character stitches. With just a push of a button, you can have your monograms embroidered seamlessly. This is more efficient compared to using a mechanical machine, however, its embroidery capabilities are still limited.
How to Embroider Letters with a Sewing Machine?
Sewing machines have various features which enable users to do embroidery and monogramming projects for towels, pillowcases, and garments.
Here is how you can create an embroidered design using a sewing machine.
Step 1. Remove the normal sewing machine foot and cover the feed dogs on your machine using plastic cover as shown in the image and thread your machine.

Step 2. Use matching thread colors to bobbin and needle as you wish. Adjust the embroidery stitch pattern as zigzag and stitch width should be adjusted to zero level on the adjustable wheel on the machine.
Step 3. Adjust the width and length of the stitch until you achieve your desired size. It is best to try out the stitch on a piece of fabric first before the actual sewing.
Step 4. Choose a template, either hand-drawn or printed. Opt for free online fonts or images, but select thicker fonts and avoid thin scripts.

Step 5.Use a wooden embroidery frame to stabilize your fabric. This ensures clean edges and prevents fraying.

Step 6.Trace your design onto the fabric with pencil or chalk. Use a method that suits your project, ensuring your guide matches the thread and project size.

Step 7. Stitch the pattern onto the fabric but be sure that you are using a proper needle.
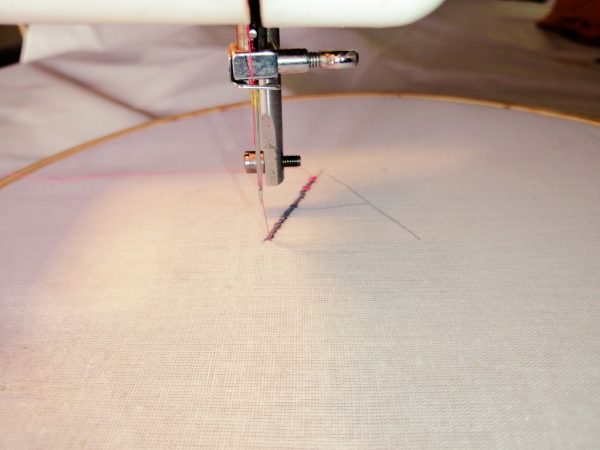
Step 8. Start stitching the edge of the first letter.

Hold the hoop while you are doing the first few stitches to secure the thread.
Step 9. Remember to move the hoop as you continue to stitch.

Guide with circling or small back and forth motions if necessary.

Tips for Success
1. The zigzag stitch is the most common stitch you can do but make sure that the stitch distance is small to achieve a solid thick line look.
2. Stitch but don’t pull the fabric to avoid uneven filling.
3. When you reach the end, raise the needle and pull and cut the thread. Deal with thread ends through back stitching.
4. Practice a few designs on scrap, using different thicknesses (number of strands), to achieve consistency and control in spacing and size of stitches.
5. You will want to tie off your thread ends conspicuously, hiding the ends under other pieces, especially if you are using white fabric.
6. Make sure you are pulling the fabric taught. Try a line of straight stitches and then release the fabric to be sure you are satisfied.
7. Depending on your machine’s features, you may need to modify it and make some adjustments that suit your letter embroidery. Be patient and have fun!
How To Embroider Letters With Brother Sewing Machines?
There are various types of Brother sewing machines with different features that allow the user to explore embroidery. This is a good way to add your personal touch to the projects you’re doing or customize your crafts.
Your machine’s embroidery capabilities depend on what model you have. Brother has two main types of stitching machines, Mechanical Sewing Machine and Computerized Sewing Machine, they have very different approaches in embroidering letters.
Using Mechanical Sewing Machine
Depending on the model, the number of built-in stitches may vary. The embroidery method used in this type of machine is called Freehand, you will be doing almost everything manually except for the stitches. Here are the steps you can follow to start:
1. Choose the appropriate presser foot for embroidery or you can remove the presser foot altogether. One tip is to cover your feed dogs with a plastic cover. This can help elevate your fabric and give you ease in using a hoop.
2. Set up the letters you want to embroider. You can print or draw any pattern that you know your machine can embroider. For letters/words, choose fonts that are thick enough for your stitches.
3. Transfer your design to the fabric using a pencil or sewing chalk. This will serve as your guide to making sure you have a clean finish.
4. You can now start stitching the letters. Using the zig-zag stitch, hold your hoop, with the fabric already fastened, in place. Remember to start stitching from the edge of the Letters. Make sure that your thread colors match and you are using the appropriate needle.
Using Computerized Sewing Machine
with over 50 to 150 available stitches, built in fonts and a small monitor display, these sewing machines are capable of more than freehand Embroidery. However, not as fully equipped as an embroidery machine.
You don’t have to manually trace and move your hoop to achieve your desired template, the machine will automatically stitch the letters you’ve chosen.
Upon turning on computerized Brother sewing machines, the LCD will light up and display the different settings the machine has as of the moment. You can easily change it by pressing a few buttons.
If you want to embroider letters or words, here are a few steps to help you get started:
1. Select the Character Stitch Key located on the Operation Panel. Most times this is displayed using a letter. Once selected, it will appear on the LCD.
2. Enter the number of your desired stitch. There are a few zigzag stitches to choose from, find out which one suits your design best and press the number.
3. After inputting the necessary letters, check the details displayed on the LCD, if it’s all good, you can start embroidering.
What Is The Best Stitch To Use To Embroider Letters?
Do you ever look at your sewing machine and wonder what the other stitches, aside from the straight stitch, are for? Most beginners often ignore these features because they are not widely used compared to the straight stitch. Let’s get to know the basic stitches most machines offer and their uses.
| Straight Stitch | Used for sewing seams, topstitching, basting, and is the most commonly used stitch. |
| Zigzag Stitch | Used for sewing stretch fabrics, embroidery, buttonholes and it is also used for decorative purposes. |
| Buttonhole | This usually involves 4 steps to complete and is used with a specific buttonhole foot. |
Mechanical sewing machines have limited stitching options. Aside from straight stitches used in sewing, zig-zag stitches are also available. For freehand embroidery, this is the best stitch choice. Most mechanical machines have more than one option for zigzag stitch, however, to produce a line that seems more substantial, choose the smallest stitching distance your machine is capable of. This will make your letters look solid and thick.
Computerized sewing machines usually have over 50 stitching options you can choose from for your monograms. Most of these functions consist of zigzag stitches and can easily be activated by pushing a button or turning the dial, depending on the sewing machine model.
It is safe to say that Zigzag stitch is the best option for embroidery and any other decorative designs unless it specifically requires a straight stitch.
How Many Threads Do I Need For Letter Embroidery?
Stitching machines generally require one thread only, used as your main thread and bobbin thread. This is the same case for letter embroidery using a mechanical and computerized sewing machine.
These machines are not capable of handling more than one thread compared to embroidery machines. Polyester threads are said to be the best choice for embroidery because they can withstand fast stitching speed and they are more durable.
Monochromatic letter embroidery designs need only one thread in one color only. However, if your monogram requires more than one color, you will have to manually change the threads.
The number of threads you will need depends on your chosen design or template. For beginners, it would be best to start with a monochromatic design.
However, hand embroidery is totally different. There are different types of threads to choose from. The number of strands used is a crucial point, too.
Do You Embroider From Left To Right Or Right To Left?
Sewing machines are built in a way where you have more free space on the left side, it is also where you attach the arm for more space. In basic sewing, the less fabrics on the right side, the easier it is to move around and sew.
However, for embroidery using a sewing machine, it is up to you where you want to start embroidering. Small size designs are easy to navigate and are more freehand embroidery friendly. Whichever part you are comfortable with starting at, you can do so without so much worry.
If you have a computerized sewing machine with built-in creative stitches, like letters and numbers, all you have to do is press some buttons and let the machine do all the work. All you have to do is keep your hoop in place to avoid messy results.
Whichever model of sewing machine you have, it is beneficial to read the manual and get to know its different functions for optimal use.
Conclusion
Yes, you can embroider letters without an embroidery machine. Your good old sewing machine can help you with the task. However, it will require you to learn and master the techniques mentioned above so you can come up with a nice finished product.
Depending on your machine’s features, you may need to modify it and make some adjustments that suit your letter embroidery. Be patient and have fun!
Crafting has always been a deep-seated passion of mine, one that has flourished and evolved over the years.
I've dedicated considerable time to both studying and practicing in the realm of fashion and sewing, amassing a wealth of experience and skills.
It brings me great joy to share these insights and experiences with you all, hoping to inspire and foster a similar passion for the art of sewing.
- How To Hem Chiffon With Tape - January 21, 2024
- How To Fix Ripped Jeans That Ripped Too Much? - January 9, 2024
- How To Make Pants Waist Smaller Without Sewing? - January 8, 2024


Comments are closed.